From quiet, tree-lined streets, some of the best eateries in the tri-state area and beyond-gorgeous skyline views, living west of the Hudson certainly has no shortage of perks, especially in the summertime. And while Hoboken and Jersey City are only a short PATH ride away from Manhattan, one humid underground minute can feel like an eternity during a bustling rush hour. However, one shouldn’t have to sacrifice style for comfort, which is why we partnered with three local salons to create fun summer hairstyles that will withstand your morning commute to Manhattan {or elsewhere}. Keep reading to discover three beat-the-heat hairstyles for your humid summer commute.
Natural Texture + Trendy Barrettes
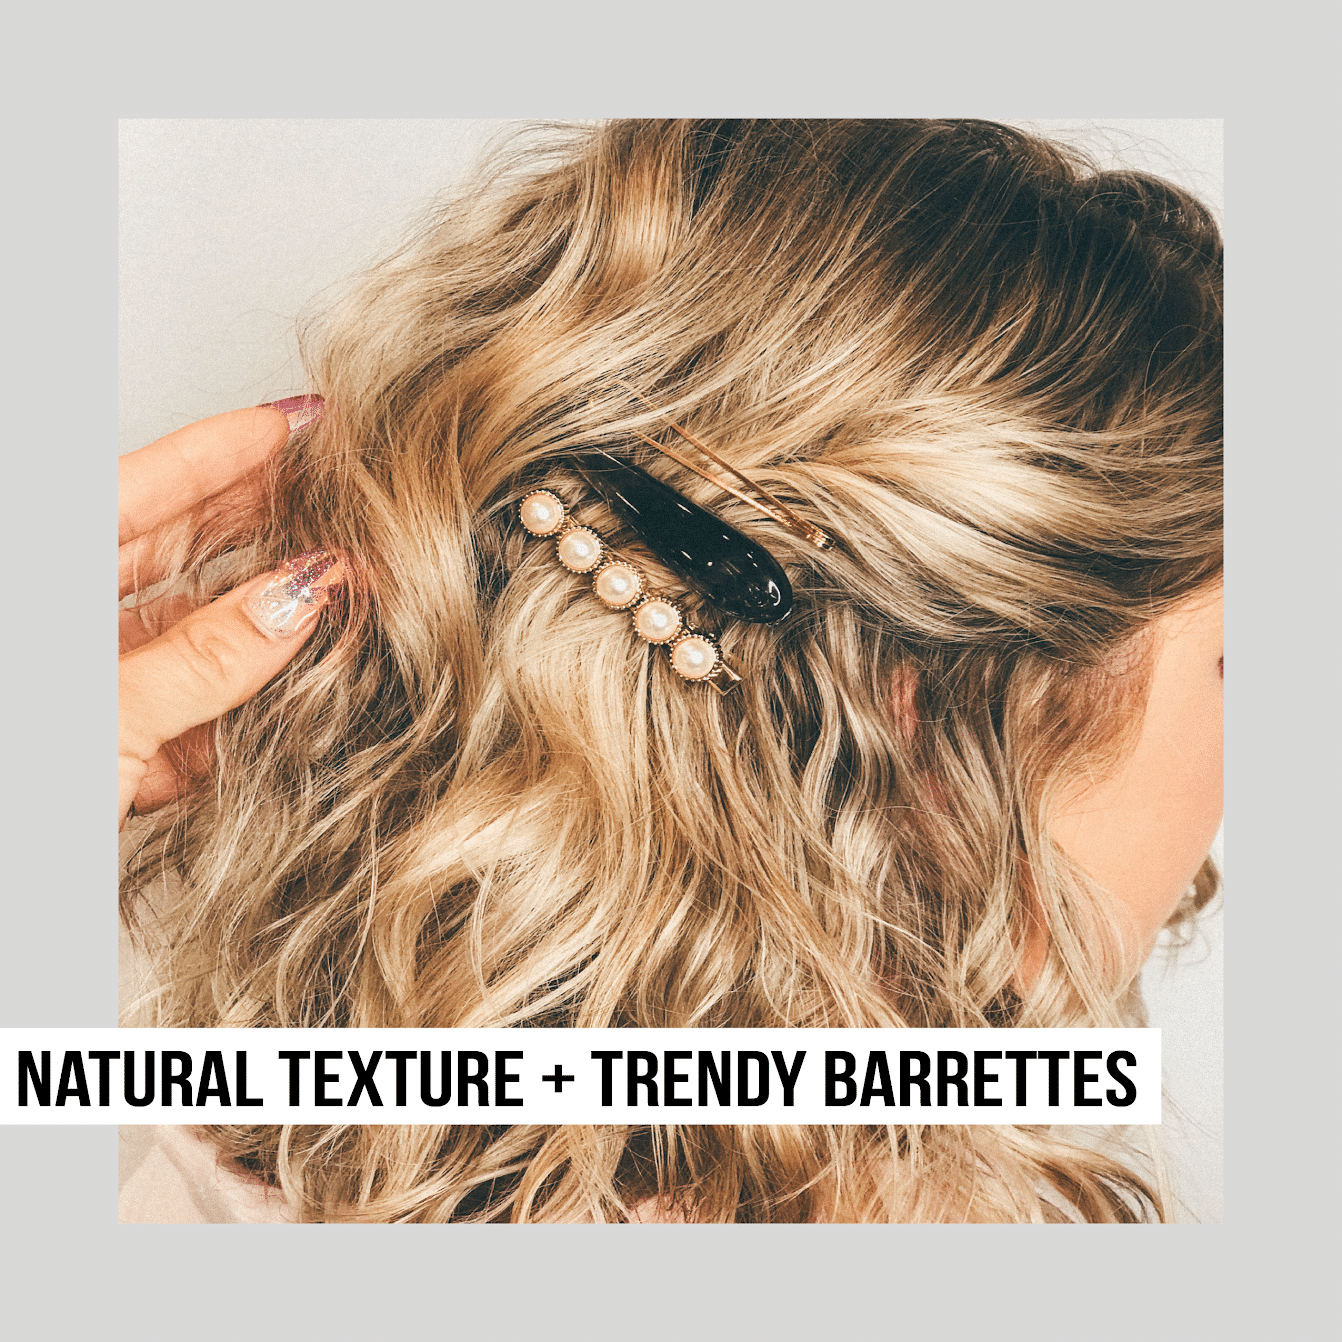
The first step to avoiding a sweaty summer commute — step away from your blow dryer. “Don’t waste energy blow drying your hair in the summer,” says Toni + Guy Hoboken stylist Ashley Lambert. “Instead, work with your natural texture—any consistency is perfect for this look!”
How to Do It
Step 1: Depending on your natural texture, add random waves into your hair using a regular barrel curling iron. Treat the curling iron like a wand, holding it upside down and twirling hair back away from your face, wrapping it around the iron. Leave about a half-inch or so of hair out of the curling iron before clamping it down.
Step 2: Once you’re happy with the texture of your hair {this look also works on pin-straight hair}, you’re ready to create your twist. Starting with the side of your part with less hair, create a section that begins at your ear up and continues up to your part.
See More: 11 Affordable Hoboken Hair Salons {That Give Sleek Cuts, Too}


Step 3: Gently twist the section away from your face and secure with a bobby pin or two, depending on the thickness of your hair.
Step 4: Dress up this classic look by adding embellished clips or barrettes of your choice over your bobby pins — bold hair accessories are back.
Step 5: Spritz hair all-over with sea salt or dry texturizing spray. Ashley used TIGI Copyright Custom Create™ Texturising Salt Spray.
Check out more of Ashley’s work at @ashhley.morgan on Instagram.
Lived-In Beach Waves
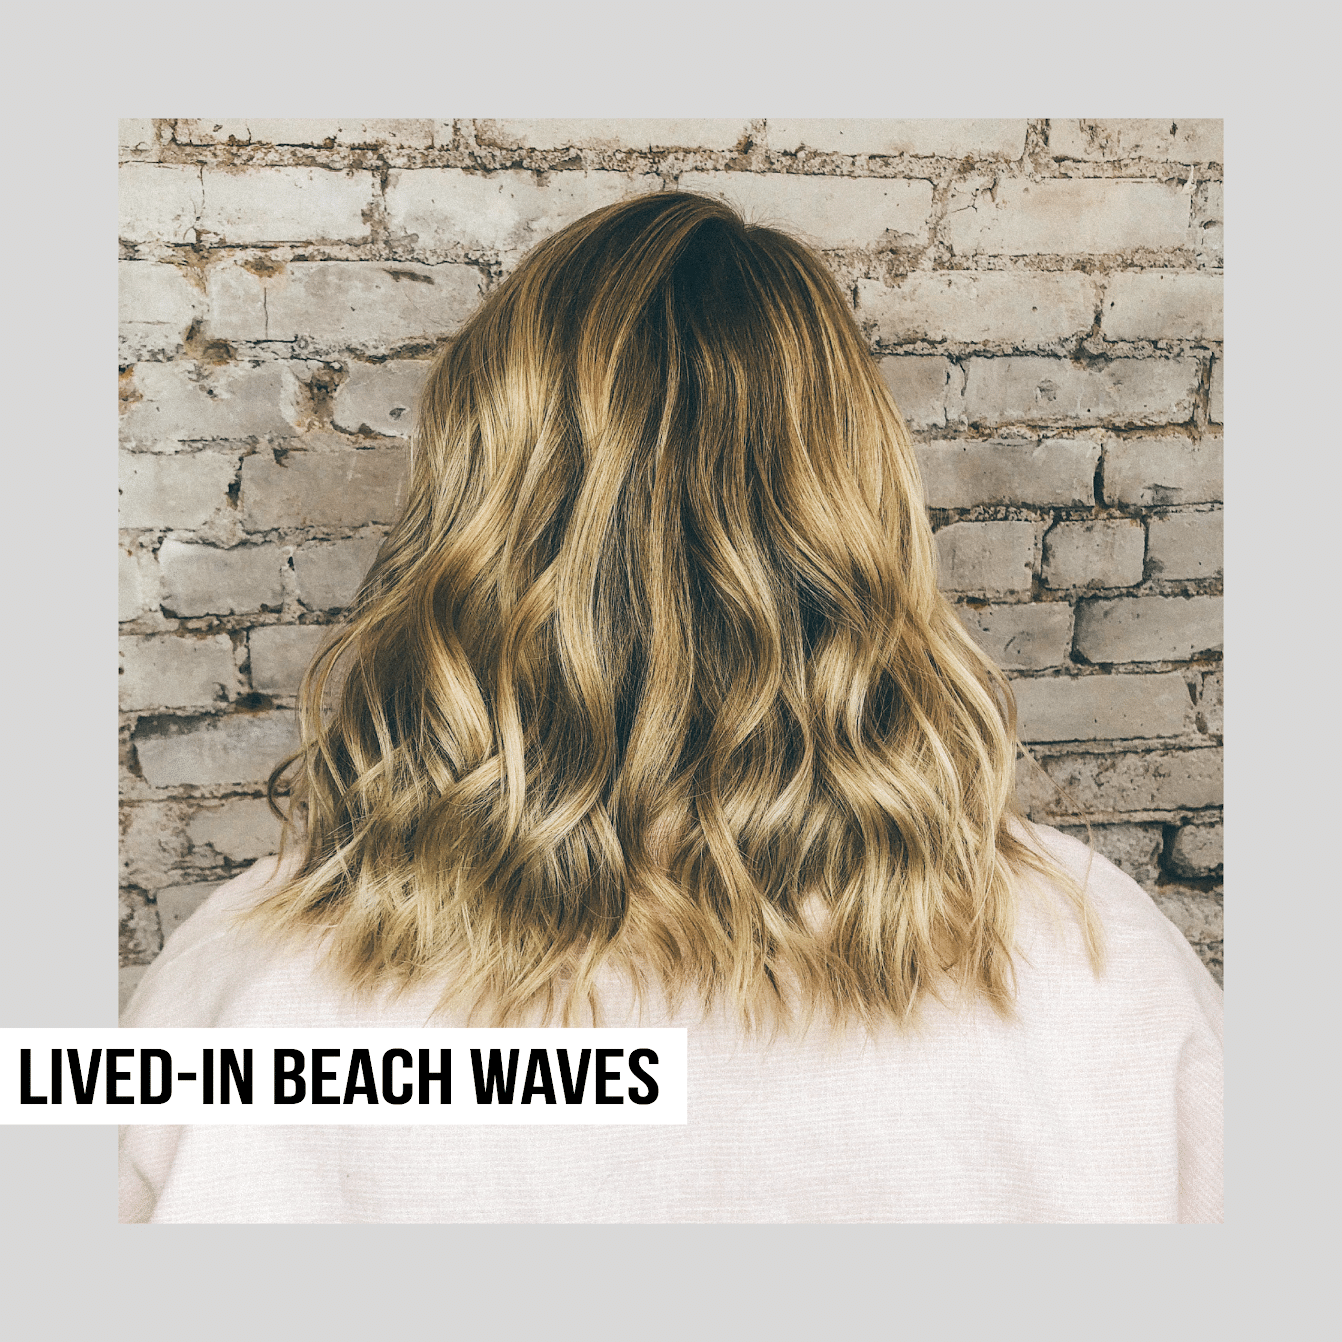
Lived-in beach waves are the no-makeup makeup look of hairstyles. Fun, versatile, and completely re-workable {you can rock these for up to three days}, this go-to look screams summer and requires less work than a traditional blowout. The key to this lived-in look is avoiding perfection, according to master stylist Gianna Coppola of Shampoo JC, a trendy boutique hair salon in downtown Jersey City.
How to Do It
Step 1: Apply a heat protectant or leave-in conditioner to your hair and then layer a styling product over it. Apply both products roots to ends and follow through with a wide-toothed comb. To create this look, Gianna used Kevin Murphy Un.Tangled Leave-In Conditioner Detangler followed by Kevin Murphy Hair Resort Beach Look Texture Spray.
Step 2: Blow-dry with purpose — aka get the job done, but don’t stress about using a traditional round brush blow out method. Using a concentrator {the nozzle-like attachment that goes on the neck of your blow dryer}, angle your dyer downward to avoid creating any frizz and work through using just your fingers, running them through your hair as you blow dry as if they were a wide-tooth comb.
Step 3: Once hair is completely dry, get to curling. For a more lived-in, tousled look, the section size and curl direction don’t need to follow any particular pattern. Just make sure that the pieces of hair framing your face are curled away from it. For a more polished {yet still casual} look, curl all hair away from your face. The key to adding the beach-like touch for both of the above options comes from leaving one to one and a half-inch sections out of the curling iron as you create your curls — these “straight ends” differentiate the style from the retro, “Hollywood Glam” hairstyles made popular in the early aughts {think Kardashian curls seasons one through five}.
Step 4: As you continue curling {you may need to separate your hair into sections, pinning some of it up as you curl the lower layers depending on your hair’s texture and thickness}, resist the urge to break up the curl spirals as you go. This is crucial — don’t panic as a “Shirley Temple” look begins to take shape around your face. The curls need time to set before being brushed through, creating the movement and separation you’re looking for. If you rush the process, you’ll end up with limper curls that won’t hold up tomorrow or the next day.
Step 5: When your entire head is curled and you’ve let the top layer cool off {you can always do your makeup while you’re waiting}, apply a light shine spray or serum to your hands {not directly to your hair} and rake through the curls with your fingers. The small amount of product on them will help avoid creating any frizz as you break the curls up, but won’t distribute so much product that your hair looks greasy.
Step 6: Apply a finishing or texturizing spray throughout your hair. Before walking out the door, gently twist and clip your hair up into a duck or butterfly clip to get it off of your neck during your commute. Because you set the curls and applied a finishing product, your beach-like waves will hold up in the clip until you get into your {likely freezing} office.
Check out more of Gianna’s work at @americanxwitch on Instagram.
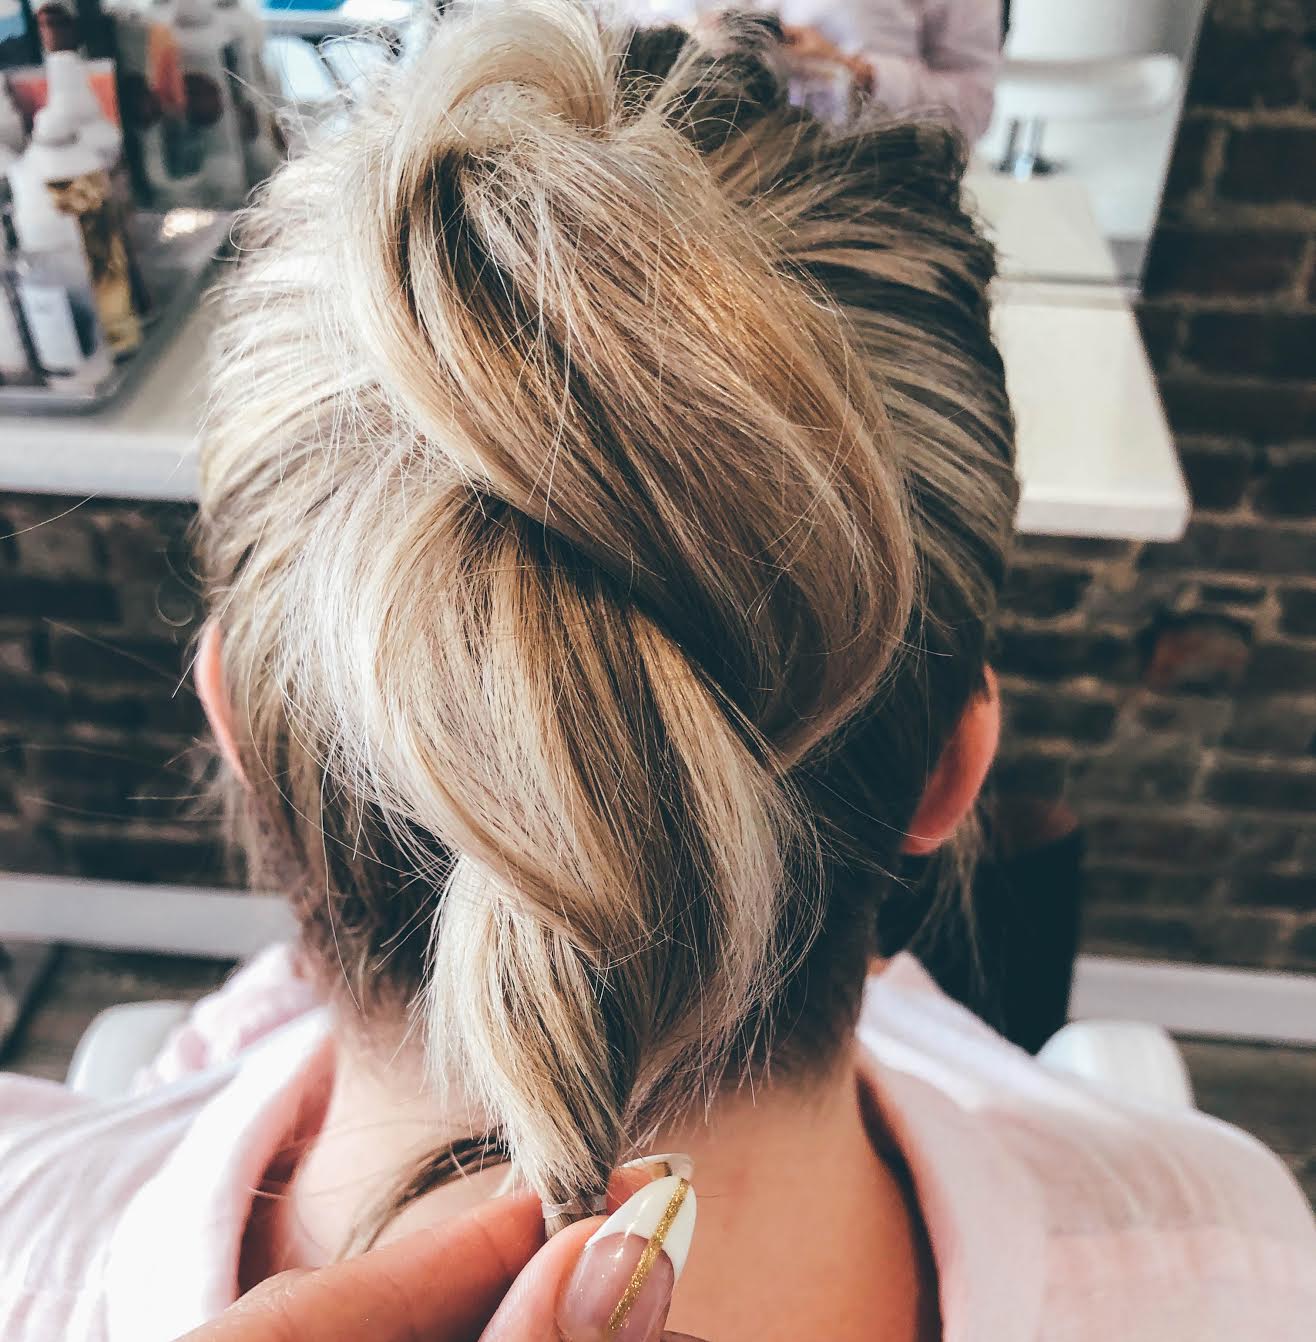
Textured Bun with Volume at the Crown
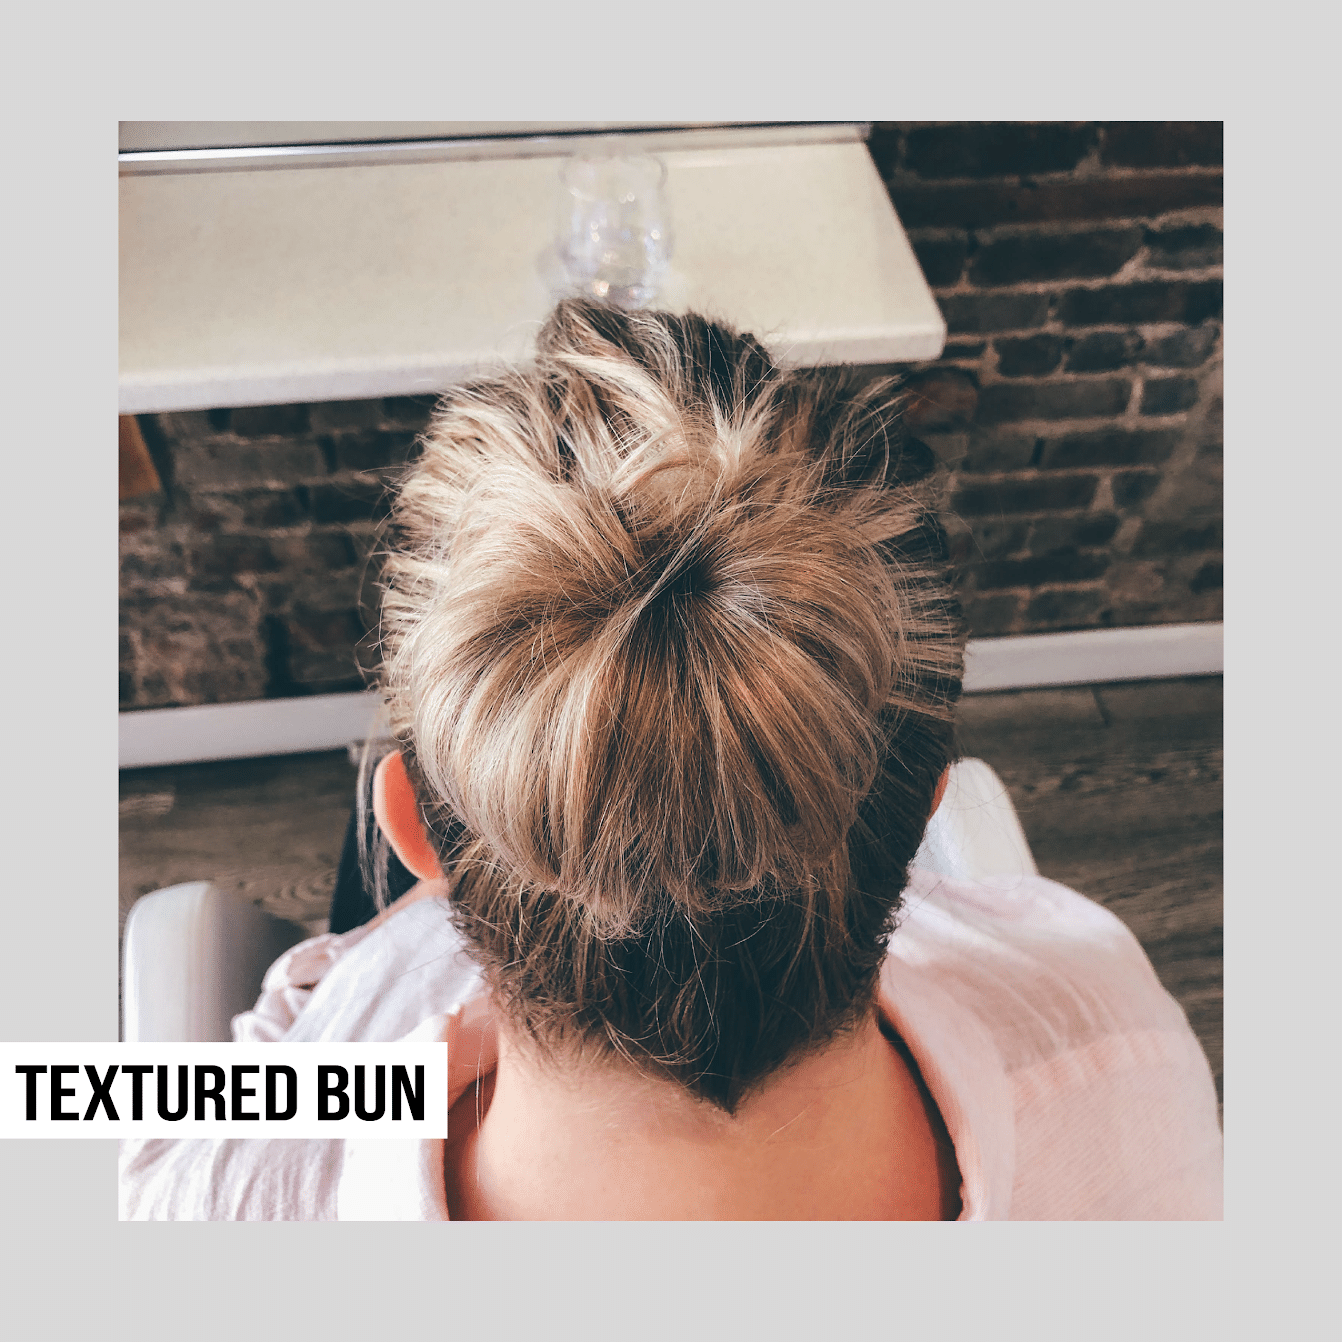
The key to creating an artfully textured updo is securing the look with bobby pins and product as you go, says Up and Out Downtown hairstylist Kai Gonzalez. While it’s tempting to just throw your hair up into a bun and secure it with an elastic during a rushed summer morning, taking the time to secure your hair not only makes it look better, but also helps create a look that you won’t have to continually re-adjust all day long.
How to Do It
Step 1: Any time you’re up-styling, you want to add a little grit to the hair before beginning the process. Kai used Moroccan Oil Dry Texture Spray. Extra points if you’re creating this look on second-day hair with residual product from a prior hairstyle.
Step 2: Sweep hair into a ponytail while maintaining a semblance of your part, lifting hair up and back at the ears, keeping the crown a bit messier. Before securing your hair tie, you can use a brush to comb the back of your hair upwards and into the ponytail for smoothness {it’s best to keep the “messiness” around your face for a fun, minimalist vibe, but the hair beneath the bun should be as smooth as possible}. If you have layered or short hair, swipe a pomade stick up the back of your bun to keep any errant hairs that don’t fit into your ponytail in place before securing them with a bobby pin.
Step 3: Using your fingers or the metal pick of a fine-toothed comb, lightly pull out some tendrils around your face. You can also use the metal pick to pull hair out of the bun a bit at the crown for added volume.
Step 4: Separate your ponytail into two pieces and wrap them around each other, creating a twist. Secure with a small elastic. Gently pull the pieces apart, widening the twist as much as you can without pulling layers of hair out of the twisted pony.
Read More: Love Lane Salon in Jersey City: A Trusted + Chic Spot Downtown
Step 5: Wrap the end of your ponytail clockwise around the base, creating a bun. Secure with pins.
Step 6: Gently pull the bun apart to achieve your desired level of “undoneness.”
Step 7: Spray with a medium hold hairspray and prepare to enjoy a sweat-free commute.
Check out more of Kai’s work at @_kaigon_ on Instagram.
Spiral Ponytail
For a look that’s quick, easy, and keeps you cool, try out this chic spiral ponytail. The trick to creating this quick yet trendy look is by following the same steps as the above bun, with a twist {literally}. We tried out Kai Gonzalez’s bun tips to create this fun summer style.
How to Do It
Step 1: Again, use Moroccan Oil Dry Texture Spray to create an extra gritty texture for styling your hair.
Step 2: Like the bun look above, sweep your hair into a ponytail while maintaining a part of your part, lifting hair up and back at the ears. Before adding your hair tie to it, use a brush to comb the back of your hair upwards and into the ponytail for smoothness.
Step 3: Next, use your fingers or the metal pick of a fine-toothed comb to lightly pull out some tendrils around your face.
Step 4: Finally, separate your ponytail into two pieces and wrap them around each other, creating a twist. Secure it with a small elastic and lightly pull the pieces apart, widening the twist as much as you can.
Have you tried one of these great beat-the-heat hairstyles? Let us know in the comments!